
Showing posts with label Unit 2. Show all posts
Showing posts with label Unit 2. Show all posts
Tuesday, 6 June 2017
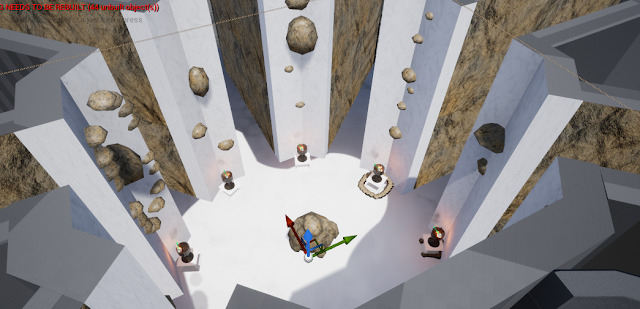
placing rocks
In todays lesson it was just a simple task of where I was given a copy of the Unreal world to place rocks around the main area, using the amazingly good rocks that I made in 3DS max and placing the texture that I made in Photoshop no them.
Tuesday, 23 May 2017
Breaking things
In today's lesson I had to make a model of a bit of the trident that would of broken off.
I did this by deleting everything but one spike on the trident model. I then went and got a box and gave it 25 length and width sections, I then adjusted it to the size of the trident cylinder so I could have it at he correct size.
I then put the box into edit mesh and then selected vertex where I then pulled them all out individually. so it looked rugged and broken.

After that I then used boolean to subtract the box from the cylinder to have the broken effect.

I did this by deleting everything but one spike on the trident model. I then went and got a box and gave it 25 length and width sections, I then adjusted it to the size of the trident cylinder so I could have it at he correct size.
 |
| trident spike before it's broken |

After that I then used boolean to subtract the box from the cylinder to have the broken effect.

Wednesday, 17 May 2017
Railing
For the railing I separated them into three different categories, The main post, the beam and the support post.
I then went and decided how many sections there where on each group. For the main post I looked at how many boxes it might take to make it and decided on 7 so I could but some design into it. For the beam it was one rectangle which would be shaped to look nice. and then the supporting posts where just going to be rectangles, simple.
 looks something like this.
To make the indented bits that make the design I just selected a rectangle gave it 3 segment and then used camper to select the section I wanted to shrink the used the size tool to shrink it.
 When I showed this to Mitch he said he wanted to change the banister design completely so it was a chain barrier instead of a wooden banister. So I duplicated the post and put on the other side I then used the torus shape to make a ring and coupled them together to make a chain which linked together from one post to the other.

I then went and decided how many sections there where on each group. For the main post I looked at how many boxes it might take to make it and decided on 7 so I could but some design into it. For the beam it was one rectangle which would be shaped to look nice. and then the supporting posts where just going to be rectangles, simple.
 looks something like this.
To make the indented bits that make the design I just selected a rectangle gave it 3 segment and then used camper to select the section I wanted to shrink the used the size tool to shrink it.


Tuesday, 16 May 2017
Rooms
In the lesson I made the main room and the side rooms for the unreal world so Mitch could set things up.
I created both the main room and side rooms using a tube which we made sure where both to the same measurements in height. With the side room it was just a simple cylinder which I then put a a cube in and used boolean to cut out the section so it had an entrance into it.
With the main room I did the exact same thing as I did with the side room, but instead of using boolean I used pro boolean which allows for multiple sections to be selected and cut out.
Side room

Main room

The main room may look weird but when it attaches to the other rooms it should hopefully look really good and impressive.
Thursday, 11 May 2017
God symbols
In today's lesson I did the last of the god symbols in Photoshop using the pen tool, eraser tool, and shape tool, and using my drawing tablet.


Wednesday, 10 May 2017
pillar
In class today and yesterday I made a pillar, which we made in 3ds max using bevel, camper, edit poly, and other stuff. I started off with a cylinder and two different sized boxes. With the cylinder I wanted to make them look like pillars from the Greek times.

I used the vertex tool, the camper tool and over tools that I can't remember the name of at the minute. I also selected the top section of the pillar and rotated in 20 degrees which slanted the indented bits of the pillar.


I also added more height sections.
I used the vertex tool, the camper tool and over tools that I can't remember the name of at the minute. I also selected the top section of the pillar and rotated in 20 degrees which slanted the indented bits of the pillar.

To do the boxes on top I just made it a 3 height segments, and went on to edit poly and selected the entire middle section and then used camper on it to push it inwards so the was an over and under hang.

Tuesday, 9 May 2017
3D and drawing
In today's lesson I made the trident we are going to use for Poseidon shrine, and crossed them over each other so they where like a coat of arms.


I also did the sketches for the Greek god symbols and neatened them up so they look nice.


I also did the sketches for the Greek god symbols and neatened them up so they look nice.


Monday, 8 May 2017
Chalice
In the lesson I decide to start on the 3D Modeling for the game by starting of with the Chalice.
I made on chalice on Saturday after work and around about the time of Midnight.

I also then made one following a tutorial at college today which looks decent.
https://www.youtube.com/watch?v=Lsr1KJbMryE&t=41s


I think the first one looks better but others say the second one is better so I decided to use that one (hahahha).
Thursday, 4 May 2017


Tuesday, 25 April 2017


Friday, 7 April 2017
Results from survey monkey project 2
When analyzing the survey I fell like Rali and I chose the appropriate questions for the game because we asked how they felt about the environment, if anything seemed out of place, and i they where able to understand the story the game was trying to tell using spatial storytelling.
I fell like the players responses for the game which are shown on the survey below show that they knew what was going of in the game and they understood the environment around them, they also pointed out things that didn't fit in to the game or they eel like was missing, for example they thought there should be sword to represent a fight, and they felt like the grave seemed out of place because it looked to new and not withered.
The results from the survey


Subscribe to:
Posts (Atom)